
Attic Fan Installation

The hot summer sun can make your attic very hot. All of that heat can also damage your roof. While extra insulation in the floor of your attic can reduce your cooling and heating costs, using a powered attic fan can get that hot air out of your attic and reduce the temperature by several degrees.
Be aware that there are scenarios where you wouldn't want to install an attic fan. If you've already alot of ventilation near where you want to install the attic fan, your fan may merely pull in outside air and blow it right back out. Also, if you don't have a good seal between the inside of your house and your attic, your attic fan can create negative pressure and pull out your air conditioned air.
Here's how we installed our attic fan.
First things first, you've got to shop around for the attic fan. They typically come in two varieties: powered and solar. The advantage of installing a solar powered attic fan is that you don't have to run any power wires to it. The down side is that they are more expensive. For our installation, we had easy access to power connections in the attic - so we decided on a powered attic fan.
If you go to your Home Depot or Lowes hardware store, you are likely to see several different fans. Note that each fan is designed to vent attics of different sizes and select the one appropriate for your attic.
Attic Fan Installation Instructions
 Save the box! The back of the attic box will usually be printed with simple installation instructions, usually in both English and Spanish. In our case,
the back of the box also contained a template for the hole size that would need to be cut into the roof.
Save the box! The back of the attic box will usually be printed with simple installation instructions, usually in both English and Spanish. In our case,
the back of the box also contained a template for the hole size that would need to be cut into the roof.
If you are careful when you remove the fan from the box, it will be easier to return to the store if there is a problem with it.
 Here's what our attic fan looked like just after removing it from its outer box. Be SURE to inspect your attic fan to make sure it's really new, never
used and undamaged. You wouldn't think that this would be a problem, but it was for us.
Here's what our attic fan looked like just after removing it from its outer box. Be SURE to inspect your attic fan to make sure it's really new, never
used and undamaged. You wouldn't think that this would be a problem, but it was for us.
Ours had a burned out motor that had clearly been in use for some time, and it had been returned to the hardware store to an unsuspecting returns clerk. Granted the store swapped out the motor no questions asked - but that was only AFTER we had installed it. Removing the fan and motor and replacing it then was a real pain. It might be best to simply temporarily wire it to a plug and give it a test prior to installation.
Attic Fan Thermostat and Humidity Settings
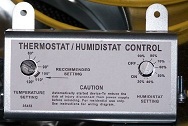 Our attic fan has two adjustments on it. The one on the left is a thermostat control that lets you set when the attic fan will turn on. It has a recommended
setting of between 100° and 110°.
Our attic fan has two adjustments on it. The one on the left is a thermostat control that lets you set when the attic fan will turn on. It has a recommended
setting of between 100° and 110°.
The second setting is a Humidistat control. The fan can be set to run whenever the humidity in the attic hits certan levels.
Wiring the Attic Fan
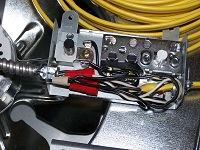 We selected a heavy gauge power, grounded wire for our attic fan. There is a conduit containing wires from the fan, ending at the fan controller box. The
power wire went into the other end. The wires are connected to the controller box using simple wire caps.
We selected a heavy gauge power, grounded wire for our attic fan. There is a conduit containing wires from the fan, ending at the fan controller box. The
power wire went into the other end. The wires are connected to the controller box using simple wire caps.
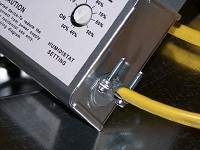 The wire is secured as seen at right. Tighten everything up so the wire can't accidentally be pulled out of the attic fan controller box.
Making a Hole in the Roof for the Attic Fan
 |
 |
 |
 |
The photos above show how hole in the roof was cut. Start small, and then use the template on the back of the box to make a hole the right size. We aren't very much for working on roofs and personally knew a contractor who fell from one with tragic results. A roofer working down the street was happy to cut the hole and mount the fan (and take the on roof pictures) for a C note.
Final Installation of Attic Fan
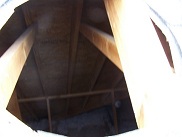
 And the final photo at right shows what the attic fan looks like, fully installed, from the inside of the attic. Note the metal strap pulling the fan down
and holding it more securely to the 2x4. There are two of these.
And the final photo at right shows what the attic fan looks like, fully installed, from the inside of the attic. Note the metal strap pulling the fan down
and holding it more securely to the 2x4. There are two of these.
The fan had some initial vibration when running. Some of this was alleviated by making sure that all of the blades were bent the same way
(remember that we had to remove and reinstall our fan because it was initially DOA). Adding the hold down straps reduced the noise from the
remaining vibration.
Disclaimer: Installing an attic fan can be dangerous because you've got to do some of the work from on top of your roof, and additional work from inside the attic - usually standing on a ladder. We take no responsibility for how you install your own attic fan. This article merely illustrates how we installed our attic fan. Be careful installing your own, or have a professional do it for you.
Copyright © 2013, Electricity-Usage.com - All Rights Reserved - No unauthorized reproduction.